How to do your own computer
To do a computer you need to have the next materials:
cabinet processor
power supply CPU cooler
motherboard connectors
RAM cables and ports
mechanical or solid state hard drive
The next you have to do is to follow the next steps:
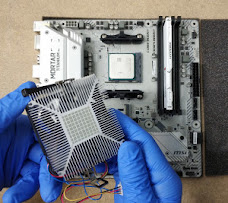
1st we need is to mount the motherboard with the processor and the RAM.
To do this, we take the motherboard out of its box and place it on a padded surface so that the components are not damaged.
The next thing is to remove the processor and place it in the socket. Note the notch in the corner of the socket so that it matches that of the processor. We fit it so that the arrows coincide like this ▷◁ and we press the clamping lever.
The next step is to spread the thermal paste on the processor and adjust the cooling system that we have selected. Finally, we place the RAM memory in its place and connect the fan connector to the socket on the board, it usually says CPU FAN and it is the one closest to the processor.
The 3rd step: Introduction of the motherboard and general wiring.
We will carefully hold it by the fan and adjust it until the screw holes coincide with the anchor bolts on the tower.We use our screwdriver to tighten it and we can proceed to wire the system.
Once everything is set up in the tower and with the fountain prepared, we proceed to put the plate inside. The first connector that we usually put is the ATX power cable for the 24-pin board. Easy to recognize because it is the largest and we only have one.
Later we proceed to connect the CPU power cable. It can be 4 or 8 pins. If it is 4, we connect it anyway, but we must bear in mind that we may have supply problems if our processor is very powerful. They usually bring it from the cheapest and crappiest sources.
We continue with the fans.
If they have Molex connectors we will connect them to the source directly. If they are 3 or 4 pins we can put them on the board if you have that possibility. The good thing about this is that connected to the board they are regulated according to the parameters that we configure in the BIOS. Direct to the source they will generally work all the time since we supply them with constant power.
At the bottom and right we find a large number of connection pins and this is where we should pay attention a little and pull out the instruction book. We thus have to locate the following connectors for the tower cables:
- HD Audio
- USB 2.0
- USB 3.0
- Reset WS
- Power WS
- HDD Led
- Power Led +
- Power Led –
- Speaker o Buzzer (Si nos viene incluido)
If we have mounted a card reader we must also connect it to a USB 2.0 connector.
Finally we go with the hard drives and readers. We will use the power supply cables to give them power and the SATA cables to connect them to the motherboard.
Once the wiring is finished we still see a large tangle of cables but before doing anything with them we will continue with the final part of the assembly.
Once the computer is working properly, we turn it off and wait a few seconds to proceed with the final adjustment of the cables, both in the front and the back.
If we have been skillful in the initial distribution we will only have to adjust them and hide them at the back using zip ties.
In this way we will have a clean team in the assembly and worthy of being admired with pride. This process is not just for aesthetics, as it will also help make airflow more efficient inside the case.
Installation of the Operating System and Drivers.
The last step is to install the operating system and then the drivers for the components that we have installed such as the motherboard or the graphics card.
It may take some time but by simply inserting the disk that the component brings us or a pendrive with the required software and an Internet connection, we will advance easily until we have our computer 100% operational.
And finally… that's it!
And if it is not clear you can follow also this video:
https://www.youtube.com/watch?v=TVPtnVD6Qz8


Comments
Post a Comment